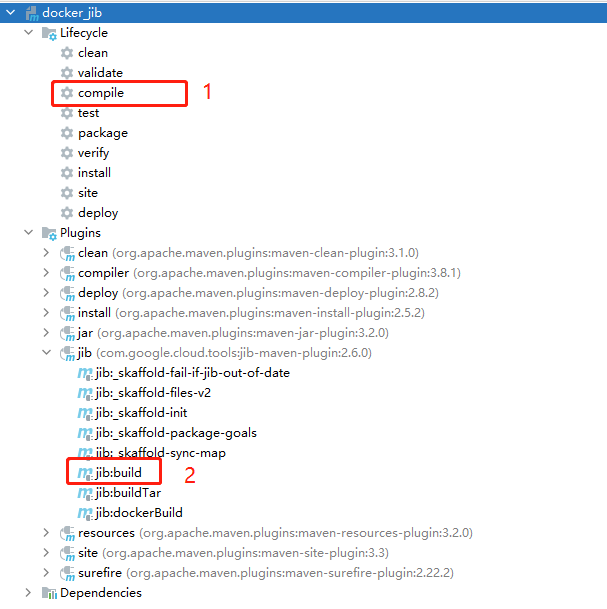
Loading... ## 使用jib快速发布镜像到阿里云 **环境** - Java8 - centos8.2 - Docker version 19.03.13 ## 小试牛刀 ```java @SpringBootApplication @RestController public class DockerJibApplication { public static void main(String[] args) { SpringApplication.run(DockerJibApplication.class, args); } @RequestMapping("/hello") public String hello(){ return "hello jlb"; } } [1]: https://cdn.ganhua.work/blog_static/images/2020-11/jib1.png [2]: https://cdn.ganhua.work/blog_static/images/2020-11/jib2.png [3]: https://cdn.ganhua.work/blog_static/images/2020-11/jib3.png ``` #### Maven配置 ```xml <properties> <jib.version>2.6.0</jib.version> <image.version>v1</image.version> <image.from>openjdk:8-jdk-alpine</image.from> <image.to>registry.cn-chengdu.aliyuncs.com/ganhua/docker-student</image.to> <image.to.username>你的阿里云用户名</image.to.username> <image.to.passwd>你创建容器时设置的密码</image.to.passwd> </properties> <build> <plugins> <plugin> <groupId>com.google.cloud.tools</groupId> <artifactId>jib-maven-plugin</artifactId> <version>${jib.version}</version> <executions> <execution> <phase>package</phase> <goals> <goal>build</goal> </goals> </execution> </executions> <configuration> <from> <!-- 表示本镜像构建所基于的根镜像为 openjdk:alpine --> <image>${image.from}</image> </from> <!-- to 中的配置表示本镜像构建完成后,要发布到哪里去 --> <to> <image>${image.to}</image> <auth> <username>${image.to.username}</username> <password>${image.to.passwd}</password> </auth> <!-- tags 中配置的是自己镜像的版本 --> <tags> <tag>${image.version}</tag> <tag>latest</tag> </tags> </to> <container> <environment> <!-- 配置文件生产环境 --> <spring.profiles.active>prod</spring.profiles.active> </environment> <jvmFlags> <jvmFlag>-Xms512m</jvmFlag> <jvmFlag>-Xmx900m</jvmFlag> </jvmFlags> <ports> <port>8080</port> </ports> </container> </configuration> </plugin> </plugins> </build> ``` #### gradle配置 ```gradle ext { set('registryUrl',"registry.cn-zhangjiakou.aliyuncs.com") set('registryNamespace',"") set('warehouseName',"") set('registryUsername',"") set('registryPassword',"") } jib { from { image = "openjdk:11" } to { image = "${registryUrl}/${registryNamespace}/${warehouseName}" tags = ["latest","${project.version}".toString() ] auth { username = "${registryUsername}" password = "${registryPassword}" } } container { /** * 设置jvm的启动参数 * user.timezone - 解决Java程序的时区问题 */ jvmFlags = ['-Duser.timezone=Asia/Shanghai'] mainClass = "cn.fingersdance.drivingschool.DrivingSchoolApplication" ports = ['8085'] } } ``` ## 运行构建  > 构建完成后,我们在 aliyun容器镜像服务 上就能看到自己的镜像了:  > 接下来,启动 Docker ,在 Docker 中执行如下命令拉取镜像下来并运行: ```bash docker pull registry.cn-chengdu.aliyuncs.com/ganhua/docker-student:v1 docker run --name jib-demo -p 8080:8080 容器id ``` > 启动成功后,我们在浏览器中就可以直接访问我们刚才的 Spring Boot 项目中的 hello 接口了:  最后修改:2021 年 10 月 19 日 © 允许规范转载 打赏 赞赏作者 支付宝微信 赞 1 社会很单纯~复杂滴是人呐~谁能在乎我呀